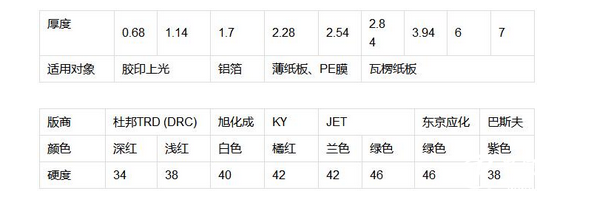
[Chinese Packaging Network News] First, common flexographic printing plate material parameters
Second, how to design a convenient version of the flexographic ink map
In the printing process, one of the key indicators that people often pay attention to is overprinting, because the overprint is often caused by waste products are often accounted for a large proportion of all waste. Although flexographic printer manufacturers have provided a good basis for accurate overprinting during design and processing, automatic monitoring systems also provide protection for accurate overprinting, but the operator's skill level and skill level also have a great influence on the overlay accuracy. . If you are designing ink maps, you can make some adjustments for overprinting, which can greatly reduce the difficulty of printing and reduce the scrap rate. The easiest way is to design the original ink as far as possible to use anti-white characters, or to hollow out between the two colors to form a reversed white outline, it is also possible to cover the third and slightly thicker edges of the two colors. Dark contours, for the printing of finer prints, trapping technology can be used. The amount of trapping depends on the accuracy of the press, the quality of the paper used for the print, and the level of the operator. Trapping processing is easy to implement on computers. Without a computer, only a ready-made color separation film, you can use a special trapping processor (Trapping Modifier), enter the value of the trapping amount, the machine will automatically generate a trapped processing Film. If there is no trapping processor, a transparent spacer can be placed between the color separation film and the copy film, and exposure can be performed with a single point light source copying machine, and similarly effective films can be obtained. What are the requirements for making flexible version on film types?
When the flexographic plate is exposed on the front of the plate making machine, to ensure the quality of the film and the flexographic printing surface, the platemaking machine is equipped with a vacuum pump to vacuum the film, and the side of the film which is required to be close to the flexographic plate must be rough (brushed). In this way, the presence of air bubbles between the film and the flexo plate can be prevented from affecting the quality of the flexographic printing surface. The pressure strips used for the flexing plate and the flexographic plate edge are also provided with an indentation and a lateral air guide. In addition, there are specific requirements for the blackness and transparency of the film.
Third, how to make a high-quality cable version and field version on one printing plate at the same time
In general, in the case of a sufficient flexo printing machine, the same color screen and field version should be divided into two productions, because the screen printing needs thinner ink layer, while the field and line version need to be thicker. The ink layer. However, under certain special circumstances, it is necessary to print the same color network lines and field images on the same plate. Under this circumstance, on the one hand, when printing, the choice of anilox roller has to be compromised. Usually, it is necessary to give priority to satisfying the printing requirements of the cable screen version at the expense of the thickness of the ink layer in the field. On the other hand, when making the printing plate, Grasp the different exposure times to ensure the quality of the same plate version of the Internet and field parts. The difference between the image part and the field part of the cable is mainly due to the different depth of corrosion. The cable part needs to have a strong foundation in order to “stand†during the process of brushing the printing plate, so the corrosion depth should be shallower. Different depths of corrosion can be obtained with different back-exposure times by masking local methods. The front exposure time should also be similar, but it is said that the current flexographic plate manufacturer has introduced a new type of flexographic plate. No matter if the printing part is a cable or a field, this type of plate needs only one unified front exposure. Time avoids the hassle of multiple exposures and makes flexo plate making easier.
Fourth, use the squeegee should pay attention to what
The use of a squeegee in the ink delivery system is optional. For rougher on-site printing or UV glazing, there is no need to use a squeegee, just adjust the pressure between the rubber roller and the anilox roller. A substantially uniform ink layer can be obtained. For the printing of general printing products, a squeegee should be used. The pressure between the rubber roller and the anilox roller should be smaller to ensure that there is enough ink to hit the squeegee blade. This is behind the squeegee blade. In order to get a uniform ink layer. In addition, the screws on the squeegee holder should be carefully adjusted. The screws can change the contact pressure between the squeegee blade and the surface of the anilox roller. If the above method does not work, that is still can not get a smooth and even ink layer, you can check the squeegee blade to see if it has physical damage or life, it may also be the fixed squeegee blade screw loose, resulting in blade and net Roller axis is not parallel. Do not scrap the squeegee with minor defects. You can run the squeegee on other vacant printing units and run it until the defect is removed. A squeegee can continue to be used even if it rubs off a few millimeters of its width during its life.
Fifth, why the use of ink to monitor pH and viscosity at the same time
As we all know, the change in the viscosity of printing ink has a direct impact on the amount of ink on the printing plate. Therefore, if ink viscosity changes, it will also affect the printing quality. Therefore, the viscosity of the ink is generally monitored in the printing process. This is particularly important in gravure printing because the gravure printing uses a low-viscosity solvent-based ink. The solvent volatilizes quickly, and the viscosity tends to change. However, flexographic printing is very different from gravure printing. When discussing the composition of water-based inks, the "amine" was mentioned. It is a solubilizing resin and determines the pH of a water-based ink. Usually, the pH value of the water-based ink should be in the range of 8.8 to 9.5. At this time, the printing performance of the water-based ink is the best and the quality of the printing product is the most stable. As the amine is constantly evaporating during the printing process, the operator will occasionally add new inks and various additives to the ink. The pH of the ink may change at any time. When the pH is higher than 9.5, the alkali is too strong, the viscosity of the water-based ink will decrease, the drying speed will be slower, and the water resistance will be worse; when the pH is lower than 8.8, the viscosity of the water-based ink will be too low. As the ink rises, the ink is easily dried and plugged onto the plate and the anilox roller, resulting in dirt on the plate and foaming.
Therefore, the pH value of water-based inks is regarded by the flexographic printing industry as one of the most critical factors in controlling the production process. In a sense, pH control is even more important than viscosity control. We recommend that the user Viscosity is linked and monitored. This is a new attempt. It is best to prepare a simple pH indicator in addition to the viscosity cup. Operators should not only understand the pH values ​​of the various ink additives used and their changes, but also should strictly follow the supplier's technical data when printing. As for the extent to which the viscosity and pH should be controlled, we believe that the more accurate and better it is, the more feasible it is. Because water-based inks have only one optimum pH and viscosity match point, water-based inks can be adapted to printers, anilox rollers, ink transfer systems, flexographic plates, substrates, drying systems, and plant environments. The composition of an external environment. Experience has shown that when overprinting another color on one color, the viscosity of the ink should be gradually increased and the pH of the ink gradually reduced. This helps the ink to dry, preventing the post-printing ink from causing the pre-printed, dried ink to wet again and affecting the print quality.
By the way, the pH range of some special water-based inks is different from that of ordinary water-based inks. For example, the pH value of gold and silver inks is 7.5~8.0, and the fluorescent ink is 7.5~8.3. Commonly used water-based ink additive types and methods of use:
1. pH stabilizer
As we all know, the pH value is important for the stability of the water-based ink, so the printing plant should first be equipped with a pH stabilizer. The pH stabilizer can supplement amines and water that are volatilized from the ink transfer system during the printing process, helping to stabilize the viscosity of the ink and ensuring print quality. According to the different substrates, pH stabilizers are divided into ordinary type and thin film type. Special pH stabilizers are used when printing fine mesh cables. The usage of the general pH stabilizer is to add 1~2% of the total ink volume every 30~40 minutes, or stir the stabilizer into the circulating ink pump.
2. Defoamers are generally added with proper defoamer to the ink before starting printing to prevent the ink from foaming. An appropriate amount of defoamer can also be added during the printing process if necessary. The amount of defoamer does not exceed 0.5 to 1% of the total ink volume at a time.
3. Fast-drying, slow-drying agent can be added to the ink according to the actual printing speed of the printing press, and the drying speed of the water-based ink can be properly changed to obtain a satisfactory printing effect. Its amount is 1~2% of the total amount of ink.
4. Withdrawal agent Under the premise of constant pH and viscosity, adding a lighter can reduce the color concentration of certain ink. Its amount should be determined according to the specific circumstances.
5. Diluent The addition of a diluent to the ink reduces the viscosity of the thickened water-based ink without affecting the pH. The amount used must not exceed 5% of the total amount of ink.
6. Enhancer The enhancer can enhance the adhesion of the printing ink or bright oil to the printing material, and the amount thereof is generally 1 to 2% of the total ink amount.
7. Destaticizing agent The destaticizing agent can effectively prevent static electricity from accumulating on the printing machine. The amount of static electricity is generally 0.5% to 1% of the total ink volume.
In response to the current situation that many brands of imported water-based inks and water-based inks produced by domestic manufacturers are trying to occupy the market, we recommend that users first become familiar with the use of various properties of an authoritative brand of water-based inks and the use of corresponding additives, and the printing quality is stable. After experimenting with other brands, the use of water-based inks or additives of the two brands should generally be avoided because different brands of inks or additives have different formulations. We have encountered the phenomenon of precipitation reaction after adding a domestic slow drying agent to imported water-based inks.
[pagebreak]
Sixth, what should pay attention when printing non-absorbent materials with water-based ink
When printing non-absorbent substrates such as films and aluminum foils with flexographic water-based inks, the appropriate printing ink should be selected first. Since gravure printing used benzene ink or alcohol ink in the past, the surface tension of the solvent is below 28 dyne per centimeter. Therefore, for the general film, the gravure ink adhesion is not a problem, and some films do not even discharge in advance. Processing can be printed. But for water-based inks, ink adhesion is critical. In order to avoid losses, a large number of tests are usually conducted before the official printing, so as to select inks with better adhesion, the surface tension value of the water-based ink or UV ink relative to the printing material should be maintained at 38 dynes per cm or more. A dyne test pen can be used to test the surface tension of the substrate. The dyne test pen is a colored pen with a felt tip. It draws a wet mark on the surface of the printing material, and then observes whether this wet mark will show a spherical oil film and how long it will take to form a spherical oil film. In order to determine the water-based ink on the printing material adhesion properties. The disadvantage of this method is that the test pen is easily blurred after it is used many times and affects its accuracy.
For users of flexographic printers using plastic film as the substrate, discharge-treated films should be purchased as much as possible, and a CORONATREATER filter should be installed on the flexo printer so that the film can be discharged again before printing. To ensure the highest surface tension value of the film. Because even if the user purchases a film that has been subjected to a discharge treatment, when the film is stored for a long time or when it is stored improperly, the original treatment effect is weakened and disappears, which affects the adhesion of the ink. However, if you choose a non-discharged film, it is difficult to make the film with good ink adhesion only after a single discharge process before printing, and it is difficult to achieve the desired printing effect.
In order to reconfirm the fastness of the ink on the printing material, the following tests can be done after proofing:
1. Scratch resistance test The thumb's fingernail was applied with moderate pressure, and was repeatedly scraped several times at the ink layer that had been printed and dried on the film. If the ink layer was scratched or the ink was peeled off, the ink was not adhered satisfactorily.
2. Tape resistance test Use 3M brand 610 or 810 adhesive tape to evenly adhere to the printed sample, press it on the back of the tape with your fingers to make it stick, and then use the two ends of the tape to pull up at moderate speed. Observe that the ink is stuck on the tape. As long as there is ink on the tape, it indicates that the ink has poor adhesion to the printing material.
3. Resistance to Dry Friction Test The two printed surfaces of the printed samples were stacked one on top of the other and applied with 2 to 4 pounds of pressure repeatedly rubbed. Scratches or peeling off of the ink indicates poor adhesion of the ink.
4. The wet rub resistance test method is similar to the above dry rub resistance test except that a little water is added between the two prints.
5. Detergent Test Drop a drop or a few drops of detergent on the printed sample. After 15 seconds, use a paper towel or a clean soft cloth to clean it. Then wipe it with medium pressure. Any change indicates poor adhesion of the ink. After the above tests, if it is found that certain ink properties cannot meet the printing requirements of the printing materials, other brand inks should be replaced and the test should be continued until a suitable ink is found.
Seventh, how to understand the plate version of the flexo
At present, the flexographic plates imported from China are basically solid photosensitive resin plates. The thickness of the plate is selected according to the requirements of the flexographic printing press. Common plate thicknesses are 1.70 mm and 2.29 mm. The flexographic plate making process is the process of transferring pictures and texts to the printing plate through the negative film. The process mainly includes the following steps:
(1) The back exposure of the plate with UV light is to determine the height of relief on the plate, ie the depth of corrosion, and solidify the substrate. (2)
The front side of the printing plate and the film are exposed under UV light to form a graphic printing portion on the printing plate and allowed to cure. (3)
The printing plate is scrubbed in a solvent to remove the unexposed portions of the plate material so that the graphic portion is embossed. (4)
The printing plate is dried in a dryer to promote the volatilization of the solvent absorbed in the plate, so that the thickness of the plate is restored to the original standard value. (5)
The post-exposure and de-tack treatment of the dried plates can further cure the shoulders and bases and improve the flexographic printing performance. The high-quality flexographic printing plate should have a printing rate of more than 500,000 prints and even as much as 1 million prints.
Eight, how to calculate the flexographic film shrinkage
The shrinkage is only related to the diameter of the plate cylinder (including double-sided tape and plate) and the thickness of the plate itself. Here is a formula used to calculate the shrinkage (percentage) of a film when it is used in a plane exposure to make a flexographic plate: Reduced volume (percentage) = K/Rx 100%.
In the formula, the coefficient K depends on the thickness of the plate used. When the thickness is 1.70 mm, K = 9.89 mm; and when the thickness is 2.29 mm, K = 13.56 mm. R is the print length of the plate cylinder in millimeters. For example, if the printing length of a certain product is R=235 mm, the thickness of the plate is 1.70 mm, K=9.89 mm, the reduced edition is 9.89/235x100%=4.21%.
When designing an ink draft, the film should be longitudinally reduced according to the above proportions, and then plate-exposure. This will enable the printed product to meet the dimensional requirements. Further explanation is that when the actual production is analyzed and estimated, the length is printed. The determination of R must take into account various factors. For example, when the module of the roller gear is 1/8 inch, the printing length can only be increased or decreased in increments of 3.175 mm; other factors can also reduce the amount of paper consumed, leaving a sticky version. The margin, and the limitations of machining indentation die-cutting tools, etc.
Nine, how to do back exposure test
We can first determine the back exposure time for different etching depth by doing back exposure test on the plate making machine. For comparison, we use multiple exposures with different exposure times for the same plate. Take a piece of media about 320 mm long and 100 mm wide. When performing back exposure on a platemaking machine, we use red cover strips to partially cover the plate, and the platesetter makes multiple exposures, resulting in five different back exposure times. Regional plate. In addition, about 20 mm of blank space is left at the end of the plate for the plate washer. Suppose we choose a flexographic plate with a thickness of 1.70 mm produced by the Dutch AV-500 combined platemaking machine and the GRACE company. After partial coverage and multiple exposures, we have exposure times of 0 on the same plate. The five sections of 15, 20, 25, and 30 seconds were exposed and placed on the drum of the printing plate for washing, about 7 minutes. Then dry in a drying oven at a temperature of 50. c, the time is 1.5 hours. Finally, the printing plate is taken out, and four different plate thickness values ​​on the printing plate can be measured by using a caliper, while the unexposed portion of the printing plate remains only the hard polyester plate base.
Through the above test, the plate-making machine can be quickly familiar with, and its test results also have guiding significance for adjusting the etching depth of printing plates. From the above experiments, it can be seen that the length of the back exposure time will affect the thickness of the substrate. Therefore, different back-exposure times should be used for plate making for different printing images. Still using a 1.70 mm thick flexographic plate as an example, the whitening and large solids on the plate will have a deeper etching depth (ie, thinner base plate), up to 1.0 mm, and the shortest back exposure time. The general picture and text part has a medium depth of corrosion, about 0.85 mm, and the back exposure time is moderate. As for the fine lines and dots, the corrosion depth should be the shallowest, about 0.63 mm, so the back exposure time should be the longest. .
In addition, there are two other points worth noting: When the printer changes to a flexible plate of another thickness or another brand of flexographic plate, the back exposure test must be performed again. With the extension of UV lamp usage time, its light intensity will be reduced. At this time, the back exposure time should be adjusted accordingly.
Tenth, how to do positive exposure test
The frontal exposure is also called the main exposure, which forms the graphic printing part of the flexo version. Proper exposure and back exposure work together to produce high-quality printing plates that meet the requirements of various graphic types.
In general, underexposure will cause the bottom of the shoulder around the graphic to be washed away, which will affect the life of the printing plate. Excessive positive exposure will result in insufficient corrosion, which can easily cause stencil printing and cause waste during printing. Before conducting the front exposure test, we recommend that the operator prepare a test “special sample†dedicated to the production of flexible plates. The “samples†should contain small anti-white, normal anti-white and field, common graphic, and small The basic printing and graphic types of lines and characters, dots, etc., and reflecting a certain number of lines (eg, 150 lpi) from 10% to 100% on the ground are all reflected in “samplesâ€. The positive exposure test can be performed using a "swatch" on the platesetter with partial coverage and multiple exposures. In the early stage, it is also possible to start from the less difficult business, from easy to difficult, to accumulate experience, and to fully master the technology of making flexible versions.
In theory, the longer the positive exposure time required for finer graphics, the more important it is to remember the combined effect of back exposure. If the anti-white characters need less back exposure and positive exposure, and the fine dots need a shallower depth of corrosion, their back exposure and positive exposure will take longer. Through common time exploration and practice, platemaking operators need to understand the limits of their own plate making, such as whether the finest lines, the smallest characters, the densest dots, and 3% of the dots can be “stoppedâ€, and whether 50% of the dots are highlighted. "Open up" and so on.
Eleven, wash plate after drying and de-adhesion should pay attention to what
With the increase in the number of solvents used, the time required for brushing the plate should be appropriately extended; according to the different plates, the position between the fine brush and the plate drum should be adjusted so as to adjust the pressure of the fine brush and the surface of the plate; if the system is extremely thin The outlets should be based on the standard thickness position to further reduce the pressure of the fine brush and prevent the outlets from being washed away. The drying temperature is about 50. c, the time is about 1.5 ~ 2 hours; in the drying process should be taken several times, check the layout of the surface for solvent spots or other burrs, can not use the fiber clean cloth, soak some fresh solvent, gently wipe The surface of the plate is then placed back in the drying oven and allowed to dry. Post-exposure and de-sticking media can greatly improve printability. The prepared flexible plate is preferably left for 12 hours and then subjected to an offset printing so that the residual solvent absorbed into the plate at the time of plate making is completely volatilized.
In short, in actual operation, the plate-making staff of the flexographic plates must cooperate closely with the personnel of the departments of ink draft design, film production and printing, communicate with each other, and sum up lessons learned in a timely manner in order to improve the overall level of flexographic printing.
Twelve, how to choose the printing unit
The number of printing units is determined by the user when purchasing the machine according to the specific print order conditions. The inking system of the printing unit is mainly in the following forms: ink roller / anilox roller, ink roller / anilox roller / doctor blade or anilox roller / doctor blade. The fountain roller is also called a metering roller. The hardness of the surface rubber and the pressure between the anilox roller and the number of screen lines of the anilox roller are the main factors affecting the ink transfer amount. In general, in the case of printing darker solid prints and the uniformity requirement is not very strict, an ink roller/anilox ink transfer system may be used, but the print quality of such a system is not comparable to a squeegee type. Inking device. Therefore, even though the use of a squeegee will increase the preparation time before printing and increase the investment, more and more users nowadays choose a printing unit with a squeegee or ink inking device.
Since the flexographic material is soft and compressible, the pressure between the printing plate and the anilox roller on the printing unit, and between the printing plate and the printing material surface needs to be finely adjusted. The adjustment knobs typically use very fine threads and require that the four directions of adjustment be independent of each other. After fine adjustment, the best state achieved should always be maintained during the printing process.
[pagebreak]
Thirteen, how to properly use and maintain the die cutter
The holding point of the round die cutter is large investment and easy to damage. During the life of a flexo printer, the total investment in die cutters can approach that of a printer. Factors that affect the life of the die cutter mainly include: the types of substrates that are die-cut, the types of inks printed on the substrates, and the maintenance conditions. If the printed matter is printed with metallic ink such as gold or silver, the wear of the cutter will be accelerated when die-cutting.
Storage
Store the die cutter in a cool, dry place. To prevent the blade from being cut, use a nylon brush to brush a thin layer of engine oil at or near the blade edge. It is best to use a box provided by the supplier of die cutters during storage to ensure that the blades are not in contact with any part or item in the box. The mould cutter can be wrapped in foam plastic. The support block in the box must be supported on the short shaft at both ends of the die cutter and cannot be supported on the blade.
transport
When packing and transportation are required, it is necessary to use suitable size and strong boxes. Only one die cutter should be placed in each box. The surface of the die cutter should be covered with foam plastic. The short axes at both ends of the die cutter need to be covered with wooden blocks with holes respectively, and the wooden blocks are fixed in the box to prevent the die cutters from shifting in the box during transportation. The outside of the box must be secured with straps. The surface of the box must be marked with the words "consumables" to attract attention.
Lifting and handling
When lifting and handling in the workshop, apply a cloth cover on the surface of the die cutter to prevent damage to the blade. When installing other parts, it is necessary to prevent the parts from loosening and fall on the die cutter. Otherwise, the die cutter will be seriously damaged.
Use maintenance
When using a die cutter, be sure to stick to the manufacturer's roller scraping felt and apply a proper amount of oil upwards every day to keep the die cutter roll shoulder and the bottom anvil roll clean and form a thin layer between the two. Thin oil film improves the wear resistance of the cutting edge of the die cutter and the anvil roll. During use, it is necessary to keep abreast of the wear of the die cutter gears, and replace the gears as necessary. Because during processing, the manufacturer intentionally makes the hardness of the die cutter gear slightly lower than the hardness of the anvil roller gear, so that the wear occurs first on the gear of the die cutter. This avoids frequent replacement of the more expensive and difficult to disassemble anvil roll gear. This situation is very similar to the relative hardness of the plate cylinder gear and the impression cylinder gear, because it is easier to replace the plate cylinder gear.
When die-cutting, remember to apply pressure evenly. The surface of the die cutter is covered with a layer of cover to reduce the impact, and small scraps of paper can also be ejected.
Make a record
To develop the habit of recording, including the number of die cuts, the date of return of the die cutter, the condition of the die-cutting paper at each job, and the use of metallic ink if necessary. With reference to these records, we can know when we need to trim the die cutter in today's thick production, and when to order a new die cutter, to avoid delaying production or wasting.
XIV. How to determine the screen according to the characteristics of the printed matter
In general, the quality of the paper is relatively rough, the speed of the printing press is faster, and 80 lines/inch to line/inch screens can be used for plate making. The printing effect is relatively good. Such as embossed aluminized paper, corrugated paper, paper stickers, ordinary offset paper to drink newspapers, etc., can use 80 lines / inch ~ 100 lines / inch screen plate more appropriate, using coated paper, painting newspapers and other materials, Printed logos, pictorials, star movies, desk calendars, merchandise ads, books and magazines, and other printed materials can be printed on the screen with 150 lines/inch to 175 lines*inches; fine-quality albums, product advertisements, books and magazines can be printed on high-grade coated paper and glass cards. For high-end products such as covers, illustrations, and packaging and decorating printed materials, screen printing plates with 175 lines/inch to 200 lines/inch can be used in order to achieve better printing process effects and improve the printing quality of products.
15. How to adjust the appropriate printing pressure
Excessive printing pressure is the main reason for the increase in flexographic printing dots. With high printing pressure, the layout is prone to expanding and deforming the dots due to excessive extrusion, and the ink at the edge of the dots is also easily transferred to the printed sheets, resulting in the phenomenon of printing stencils, ghosting, or dots. The production process shows that the use of smaller printing pressure is an important measure to improve the printing quality of outlets. Therefore, the printing pressure should be reasonably adjusted and the pressure should be reduced as much as possible. The actual control of the pressure generally controls the compression of the printing plate within 0.1 mm. Usually, the pressure is relatively small when printing delicate network cables, and the pressure is higher when printing in the field. The flexographic plate has a low hardness and is relatively uniform when in contact with the support, and the printed ink is also relatively uniform, but the dot gain is more severe, and the reproducibility of the image layer is poor. Therefore, in the printing of glossy substrates and mesh halftone prints, the hardness of the plate is required to be higher, and when the rough surface of the substrate and solid prints are printed, the hardness of the plate is required to be lower in order to improve the product. Printing quality.
16 adjust the pressure of ink supply
If the ink supply pressure is too high, on the one hand it is easy to make the screen mesh wear and deformation, on the other hand, the ink on the ink roller is easy to form a squeeze phenomenon on the plate surface, so that the layout ink layer is not uniform or there is a paste plate defect. If the pressure of the ink roller is too light, the ink on the plate may be unevenly and insufficiently printed, making the dot printing unclear. Therefore, it is necessary to adjust the contact pressure between the ink roller and the printing plate layout.
Seventeen, ink selection
The ink used for flexographic printing is a low viscosity ink similar to gravure printing. According to the quality requirements of the product, inks with different binders and solvents are selected for printing. For example, in order to obtain prints with good heat resistance and toughness prints, it is possible to use inks made of acrylic alcohols as a binder; it is desirable that the prints have a good gloss and can be selected using a polyurethane resin as the binder. For example, on the polyethylene non-absorbent film, you can choose quick-drying, good adhesion solvent ethanol ink; if printed on corrugated cardboard, books, newspapers, can be easily cleaned, no environmental pollution Water-based ink.
18. How to Print a Large Area of ​​Earth Color
Household appliances have a large size and large printing format. Many of them contain large blocks on the ground. They require high color brightness, and some require overprinting on the design. This requires that when printing, it is necessary to ensure that large areas are well-grounded and well-applied. Press lightly to ensure that the quality of the overprint is good and the strength of the paperboard is not damaged; it is necessary to handle large blocks of thick ink on the ground (generally 80μm or more) to achieve the required color brightness and saturation, but also to ensure the small text, Fine lines and screen images are clear and moist. It is indeed difficult for the four to take into account.
In order to ensure a good printing effect in a large area, the large-area field parts and small text, thin lines, and screen images can be made publicly. The hardness of the plate material selected for the large-scale field part is suitable for HS40. The hardness of the plate material selected for the small text, fine lines, and screen images is suitable for HS50-HS55. Note that the thickness of the media must be consistent. The liner material replaces the blanket liner with a foam liner, and the base is based on a thin polyester film base. In this way, large-area real-time printing with small text, thin lines, and screen images are printed on the same surface at the same time. However, the actual printing pressure in printing is different, and the printing pressure on large-scale field locations is less than The printing pressure of the small text, thin lines, and screen images is not only not leaking, but also the corrugated surface paper is not concave. This is generally considered to be a large area where the press must be slightly larger in order for printed ideas to be exactly the opposite.
The key point here is that the flexibility of the printing plate is fully utilized: the large area is under slight pressure, but the kiss is full, the printed ink is very good, and there is no hard port; the small text, thin lines, and screen images are partially The plate has a high hardness, and the dots cannot be easily deformed.
In fact, we have all experienced such experiences: When we print a large area on the ground, if the pressure is too high, it will inevitably lead to defects or leaks.
[pagebreak]
19. How to handle overprints and overprints
Large-area solid-field printing mostly requires a thick ink film, which is difficult for small print.
To solve this contradiction, it is also possible to separate large-scale on-site and small-area graphic and graphic designs. However, when printing, two versions of the same color are used for overprinting. Large-area field versions are used for thick ink, and small-area graphic versions are used for light ink, but they cannot be too different. Large, so as not to be too far away from the hue. By taking the required printing pressure, you can also obtain the desired printing effect. This treatment method is superior to the large-area solid ink effect obtained by the stencil sheet printing method.
When overprinting, it is required that the viscosity of the subsequent color ink be moderate, and the viscosity of the subsequent color ink should be slightly higher, and the control is preferably 50 seconds. At the same time, it is also necessary to control the drying speed of the previous color, and the water content of the cardboard must also be low.
In the drying process of the ink, the evaporation drying and the soaking and drying are performed at the same time. The printing ink layer thickness is real-time, and the evaporation and drying are often performed very slowly, and the permeation drying can not be performed completely, which will inevitably affect the subsequent color superimposition. At this time, according to the level of ink PH value, properly add stabilizer or ethanol to adjust, so that ink drying faster, so as to prevent two-color adhesion and false false. If necessary, another printing press can be used for overprinting. At this time, the ink of the preceding color is already dry, and the overlapping printing is easier.
Twenty, how to give flexo printing machine with anilox roller
Most prints have both solid, line, and continuous tone images. In order to meet the needs of various types of printed products, users must not take the practice of using several anilox rollers with several printing units on the flexo press.
Taking the narrow-width unit type flexo press as an example, the current domestic introduction is mostly 6+1 type, that is, 6 color groups are exclusively used for multi-color printing, and the last unit can be printed and UV-cured.
We suggest that for prints up to 150 lines, this 6+1
Flexo printing machine should be equipped with 9 anilox rollers. Four 700 lines, an ink layer thickness of 2.3 BCM (1 billion cubic microns per inch), and an anilox roll of 60 degrees are used for the lithography printing; three 360 ​​to 400 lines, a BCM of 6.0, and a 60 degree screen Rollers are used for field printing; two 200-line, BCM15, and 60° anilox rolls are used for printing and polishing.
If water-based bright oil is used, 360-line anilox roller should be used, so that the oil layer is slightly thinner and will not affect the printing speed due to the problem of drying of the bright oil. Water-based gloss oils do not have the special smell of UV bright oil.
The position of the anilox roller during printing can be determined through testing and comparison. The thickness of the ink layer that can be observed by the operator during the test depends mainly on the number of lines and the BCM value of the anilox roller.
Twenty-one, anilox roller should pay attention to what issues during use
Laser engraved ceramic anilox roller is used in aerospace, aerospace high temperature, wear-resistant coating materials, according to a certain density, depth and a certain angle, shape, using laser engraving. This anilox roller is characterized by its high cost and wear resistance. If it is used properly, its life can be as long as several years. If it is used improperly, not only the service life will be shortened, but also the anilox roller will be scrapped. In the process of use, the position of an anilox roll on the printing press depends on the specific print, different prints, and the position of the anilox roll is different. Therefore, the wire roll is often replaced during printing.
At present, narrow-width machines use mostly solid steel anilox rollers, which are very heavy. When loading and unloading the anilox roller, care must be taken to avoid touching the surface of the anilox roller against other metal objects. Because the ceramic coating is very thin, permanent damage can be easily caused by a collision. During the printing and cleaning process, the ink should be prevented from drying on the anilox roller. The special detergent recommended by the water-based ink manufacturer should be used. The stainless steel brush should be used for scrubbing. The cleaning must be clean and thorough. And develop a habit of using high-power magnifying glass to observe the anilox roller nets. Once ink is deposited on the bottom of the net and gradually increase, it should be promptly cleaned. If the above method does not work, ultrasonic or sandblasting treatment can be used, but it must be done under the guidance of the anilox roller manufacturer. Under normal use and maintenance conditions, there is no need to worry about the problem of anilox roller wear. The main component of the ink-transfer system that is subject to wear is a squeegee. Compared to this, the wear of the anilox roller ceramic coating can be described as negligible. When the anilox roller slightly wears, the ink layer becomes thinner.
Twenty-two, anilox roller cleaning
在网纹辊出现的质é‡é—®é¢˜ä¸ï¼Œå…¶å®žé™¤å°‘æ•°æ˜¯å› å…¶ä½¿ç”¨æ—¶é—´è¿‡é•¿ï¼Œé€ æˆä¸¥é‡ç£¨æŸå¤–,ç»å¤§å¤šæ•°æ˜¯ç”±äºŽå¯¹ç½‘纹辊的清洗ä¸å½“或清洗ä¸å½»åº•é€ æˆçš„。如何ä¿æŒç½‘纹辊的良好清æ´çŠ¶æ€,对ä¿è¯å°åˆ·è´¨é‡è‡³å…³é‡è¦ã€‚
网纹辊的清洗å¯åˆ†ä¸ºæ—¥å¸¸æ¸…洗和周期清洗,最é‡è¦çš„是日常清洗,æ¯å°åˆ·å®Œä¸€ä¸ªå°ä»¶å°±åº”尽快清洗网纹辊,除掉网纹辊上残余的油墨。任何一ç§èƒ½ä»¤äººæ»¡æ„的网纹辊清洗系统,都必须åšåˆ°åœ¨å½»åº•æ¸…除æ¯ä¸ªç½‘穴底部的残墨颗粒ç‰æ®‹ç•™ç‰©ï¼ŒåŒæ—¶ä¿è¯ä¸æŸå网穴的网墙。
ç›®å‰ï¼Œç½‘纹辊的清洗工艺主è¦æœ‰ç‰©ç†æ¸…洗法和化å¦æ¸…洗法。下é¢ä»‹ç»å½“å‰å¸¸ç”¨çš„å‡ ç§æ¸…洗方法和æ“作è¦é¢†ã€‚
Aã€ç‰©ç†æ¸…洗法
物ç†æ¸…洗法有介质喷射冲洗法(包括å°è‹æ‰“喷洗法ã€å¹²å†°å†²æ´—法ã€å¡‘料细ç 喷洗法ã€é«˜åŽ‹æ°´å†²æ´—法),超声波清洗法,激光清洗法。
â‘´å°è‹æ‰“粉喷洗法。
这是一ç§ä½¿ç”¨å°è‹æ‰“ç²‰ï¼ˆç¢³é…¸æ°¢é’ ï¼‰å’ŒäºŒç¢³é…¸é’ é…制æˆçš„粉状清洗介质,é 喷射力清除网穴内干结的残留油墨ã€æ ‘è„‚ã€æ¶‚布料ç‰ï¼Œè¾¾åˆ°æ¸…洗的目的。其优点是:低压喷洗,一般使用0.4MPa的安全压力。æ¤å¤–,å°è‹æ‰“粉的质地比网纹辊表é¢æ¶‚层柔软得多,颗粒较å°ï¼Œå¯è¿›å…¥ç½‘ç©´ä¸ï¼Œæ¸…洗效率较高,åˆå¯ä¿è¯ç½‘纹辊表é¢å®‰å…¨åŠç½‘ç©´å£ã€‚å°è‹æ‰“细ç 是一ç§æ˜“溶ã€å®‰å…¨æ— 毒ã€æ— 害的物质,有利于环ä¿ã€‚å°è‹æ‰“粉清洗ä¸é€‚于600线以上的ä¸é«˜çº¿æ•°çš„ç½‘çº¹è¾Šï¼Œå› ä¸ºå®ƒå®¹æ˜“å¼•èµ·ç½‘å£åˆ’伤现象。
⑵干冰喷洗法。
这是利用液æ€CO2制æˆå›ºä½“CO2的干冰,在清洗设备内装入已制作好的干冰颗粒或干冰å—,在压缩空气的驱动下,高密度干冰颗粒或细粉éšç€åŽ‹ç¼©ç©ºæ°”冲击到被清洗物体表é¢ï¼Œä»Žè€Œèµ·åˆ°æ¸…洗作用。
干冰清洗的主è¦ä¼˜ç‚¹æ˜¯ï¼šâ‘ 节约费用。干冰在线清洗,节约了大é‡çš„åœæœºæ—¶é—´ï¼Œä¸éœ€å¢žåŠ 劳动力和生产设备,é™ä½Žè´¹ç”¨ã€‚②延长设备使用寿命。③对网纹辊ã€æœºä¸ŠæŽ§åˆ¶å…ƒä»¶ã€å¼€å…³ç‰éƒ½ä¸ä¼šæŸä¼¤ã€‚④安全环ä¿ã€‚干冰清洗ä¸æ±¡æŸ“环境,ä¸äº§ç”ŸåºŸç‰©æ®‹ç•™ã€‚但干冰清洗容易引起陶瓷表é¢çš„爆裂,它ä¸èƒ½ç”¨äºŽæ¸…æ´—é«˜çº¿æ•°çš„ç½‘çº¹è¾Šã€‚å› ä¸ºå¹²å†°æ— æ³•æ·±å…¥åˆ°ç½‘ç©´åº•éƒ¨ï¼Œå½“ç„¶ä¹Ÿå°±æ— æ³•æ¸…é™¤ç½‘ç©´åº•éƒ¨çš„æ‚è´¨äº†ã€‚å› æ¤ï¼Œå¹²å†°æ¸…洗法一般åªé€‚用于清洗网线数较低的网纹辊。
(3)超声波清洗法
超声波清洗是一ç§é«˜æ•ˆçš„清洗方法,但è¦æ³¨æ„的是超声波装置应调到适åˆæ¸…洗的频率上。大多数使用超声波清洗的å°åˆ·åŽ‚还è¦é…åˆä½¿ç”¨å¼ºè…蚀性溶液,以æ高效率,å‡å°‘清洗时间。由于柔性版å°åˆ·å¤šé‡‡ç”¨æ°´åŸºæ²¹å¢¨ï¼Œä»¥è¶…声波清洗法在清洗之å‰æœ‰ä¸€ä¸ªæµ¸æ³¡è¿‡ç¨‹ï¼Œç”¨æ¥è½¯åŒ–陶瓷网纹辊网穴ä¸çš„残墨ç‰ç¡¬æ‚质。这个程åºæ ¹æ®è¾Šçš„大å°åŠæ²¹å¢¨å µå¡žæƒ…况而定,一般è¦0.5~24å°æ—¶ã€‚超声波清洗法利用超声波æ¥äº§ç”Ÿè¶…声波空化现象——以机械形å¼å½¢æˆç²¾å¾®çš„气泡,这些气泡在压力作用下,当接触网纹辊表é¢æ—¶ä¼šå†…å‘爆炸,内å‘爆炸释放的能é‡ä¼šå½¢æˆä¸€ç§æ…动作用或者是摔除作用,将残墨ç‰æ‚质从网纹辊的网穴ä¸æ¸…除掉。
超声波空化强度å—ä¸‹åˆ—å› ç´ å½±å“:
超声波强度。最好å‚考清洗设备生产厂商推èçš„è¶…å£°æ³¢å¼ºåº¦æ ‡å‡†ã€‚
超声波频率。超声波频率与空化现象的强度æˆå比。频率增大,气泡å˜å°ï¼Œç©ºåŒ–强度亦å˜å°ã€‚一般情况下,选用最å°é¢‘率4万赫兹所生æˆçš„气泡就å¯ä»¥äº†ã€‚
浸泡温度。浸泡溶液的温度一般ä¿æŒåœ¨60℃~70℃较好。
清洗时间。清洗时间是最é‡è¦çš„å› ç´ ï¼Œç½‘çº¹è¾Šç½®äºŽè¶…å£°æ³¢æº¶æ¶²ä¸çš„时间越长,其网穴越容易å—æŸå®³ã€‚许多超声波清洗法采用预浸泡程åºï¼Œè€ŒåŽç”¨è¶…声波清洗5分钟,或时间å†ç¨çŸäº›ï¼Œä»¥ä¿æŠ¤ç½‘纹辊上的网穴ä¸å—æŸå®³ã€‚
(4)激光清洗法
è¿™æ˜¯è¿‘å¹´ç ”åˆ¶å‡ºçš„ä¸€ç§æ–°åž‹æ¸…洗方法,使用带特殊光å¦å™¨ä»¶çš„激光装置æ¥æ¸…洗网纹辊。在清洗系统ä¸ï¼Œæ¿€å…‰è¢«ç½®äºŽå…‰å¦å™¨ä»¶ä¸ï¼Œä»¥ä¿æŠ¤é™¶ç“·ç½‘纹辊表é¢ï¼Œä½†æ˜¯å¯ä»¥è’¸å‘掉网纹辊上的残墨ç‰æ‚质。æ®ç§°ï¼Œè¿™ç§æ¸…洗法å¯ä»¥æ¸…洗最高网线数为1200线/英寸的激光雕刻陶瓷网纹辊,从网穴ä¸æ¸…洗掉干墨ã€èžåˆå‰‚ã€èœ¡ã€ç¡…ã€èšå››æ°¯ä¹™çƒ¯ã€ç‰ˆæ颗粒甚至刮刀颗粒ç‰ï¼Œè€Œä¸æŸå网纹辊上网穴。
在供墨åŠæ¸…洗上,用于å‘å°åˆ·éƒ¨ä»¶å®šé‡ä¾›åº”油墨并自动清洗网纹辊ã€è…”å¼åˆ®å¢¨ç³»ç»Ÿã€æ²¹å¢¨æ³µä»¥åŠæ²¹å¢¨ç®¡ï¼Œæ¸…洗顺åºç”±è®¡ç®—机控制,æ高了效率和质é‡ã€‚
Bã€åŒ–å¦æ¸…洗法
化å¦æ¸…洗法也称碱性溶剂清洗法,它是将具è…蚀性的碱性(pH值为8~14)清洗剂用涂抹ã€ç‚¹æ»´ã€å–·æ¶‚或浸泡ç‰æ–¹å¼å°†ç½‘穴内的残留物软化ã€æº¶è§£ï¼Œç„¶åŽå†ç”¨é«˜åŽ‹æ°´è¿›è¡Œæ¸…æ´—ã€‚æ ¹æ®æ¸…洗剂碱性的强弱,å¯åˆ†ä¸ºå¼ºç¢±æ¸…洗法:清洗剂的pH值为12~14,为高效清洗剂。但它å˜åœ¨å¯¹é‡‘属æ料具强力è…蚀,对人体接触有一定å±å®³ç‰ç¼ºç‚¹ï¼Œå› æ¤ä¸é€‚åˆæŠ—è…蚀性低的网纹辊。ä¸æ€§ç¢±æ¸…洗法:清洗剂的pH值为10~12,是一ç§åº”用éžå¸¸å¹¿æ³›çš„温和型清洗剂,å¯å°†è‰²æ–™åŽ»é™¤ï¼Œä½†å¯èƒ½ä¼šç•™ä¸‹æ®‹ä½™ç‰©ï¼Œä»Žè€Œå½±å“清洗效果。弱碱清洗法:清洗剂的pH值为8~10,属于有效清洗剂。但它容易è…èš€ç½‘ç©´ï¼Œé€ æˆç½‘ç©´æŸä¼¤ã€‚
由于化å¦æ¸…洗法的清洗剂渗é€æ€§è¾ƒå¼ºï¼Œå¯¹1000线以上的网纹辊的网穴也å¯æ¸—é€åˆ°åº•éƒ¨ï¼Œå› æ¤å…·æœ‰è¾ƒå¥½çš„清洗效果,应用较广。
化å¦æ¸…洗法一般å¯åˆ†ä¸ºåŒ–å¦æº¶æ¶²æµ¸æ³¡æ³•å’ŒåŒ–å¦æº¶å‰‚刷洗法。
a.化å¦æº¶å‰‚浸泡法
该法需è¦ä¸“用设备,先用化å¦æ¸…洗剂æ¥æº¶è§£ç½‘ç©´ä¸æ®‹ç•™çš„油墨ç‰ç‰©è´¨ï¼Œç„¶åŽå†ç”¨é«˜åŽ‹æ°´æµæ¥å†²æŽ‰å·²æº¶è§£çš„残留物。æ“ä½œæ—¶é¦–å…ˆå°†ç½‘çº¹è¾Šæ”¾ç½®åœ¨æ¸…æ´—æœºå†…ï¼Œå¹¶åŠ å…¥æ¸…æ´—å‰‚ï¼Œå°†ç½‘çº¹è¾Šå…¨éƒ¨æˆ–éƒ¨åˆ†æµ¸æ³¡åœ¨æ§½å†…ï¼Œæ¸…æ´—å‰‚çš„æ¶²é¢é«˜åº¦ä»¥ä½¿ç½‘纹辊的1/2~1/3è¢«æµ¸æ³¡ä¸ºå‡†ï¼Œå°†æ¸…æ´—å‰‚åŠ çƒè‡³40℃~60℃度,网纹辊在ä¸åœè½¬åŠ¨çš„状æ€ä¸‹æ¸…æ´—2å°æ—¶å·¦å³ï¼Œè®©æº¶å‰‚溶解软化干涸的油墨,然åŽç”¨é«˜åŽ‹æ°´å–·å°„回转的网纹辊,去除清洗液和已被溶解的油墨ç‰æ®‹æ¸£ï¼Œæœ€åŽç”¨é«˜åŽ‹æ°”体进行干燥。但æ¤æ³•å˜åœ¨ä¸€ä¸ªæ¸…洗废水的处ç†é—®é¢˜ï¼Œåº”é…备一个分离装置,把水从残墨与化å¦æ¸…洗剂ä¸åˆ†ç¦»å‡ºæ¥ã€
b.化å¦æº¶å‰‚刷洗法
化å¦æº¶å‰‚剂刷洗法就是将化å¦æº¶å‰‚喷射在网纹辊表é¢ï¼Œæ ¹æ®ç½‘纹辊æ料选用适宜的细密刷å(陶瓷网纹辊用ä¸é”ˆé’¢ä¸å°åˆ·ï¼Œé‡‘属网纹辊用铜ä¸åˆ·å),åå¤åˆ·æ´—。这ç§æ–¹æ³•åªé€‚于清洗粗网线的网纹辊。其优点是设备简å•ï¼Œæ“作方便,æˆæœ¬ä½Žå»‰ï¼Œæ¸…洗容易,ä¿æŠ¤çŽ¯å¢ƒã€‚å…¶ç¼ºç‚¹æ˜¯æ— æ³•æ·±å…¥åˆ°ç½‘ç©´ä¸åˆ·æ´—,很难清洗墨穴底部的污垢åŠç§¯å¢¨ï¼Œæ‰€ä»¥æ¸…æ´—ä¸å½»åº•ï¼Œä¸èƒ½æ¢å¤ç½‘穴容积。
二å三ã€å°åˆ·æœºåˆ®å¢¨è¾Šçš„选é…
很多å°åˆ·äººå‘˜è®¤ä¸ºï¼Œå°åˆ·è´¨é‡å¥½å的主è¦åŽŸå› 在于网纹辊的线数和质é‡ï¼Œè€Œå¿½è§†äº†åˆ®å¢¨è¾Šçš„硬度和ä¸é«˜ã€å°åˆ·æ»šç’的平衡度ç‰å…¶ä»–åŒæ ·é‡è¦çš„å› ç´ ã€‚
刮墨辊对于油墨的å‡åŒ€ç¨‹åº¦ã€ç½‘点åŠç»†å¾®æ–‡å—å°åˆ·çš„清晰度起ç€å†³å®šæ€§ä½œç”¨ã€‚250线的陶瓷网纹辊如果é…上硬度35°的橡胶辊,å°åˆ·ç½‘点和较å°çš„å—体åŠçº¿æ¡æ—¶éžå¸¸å›°éš¾ï¼Œå› 为比较软的胶辊使转移到网纹辊上的墨层较厚,但180线的钢辊é…上硬度为75°和光æ´åº¦ä¹Ÿè¾ƒé«˜çš„胶辊,ä¸ç®¡æ˜¯å®žåœ°å°åˆ·è¿˜æ˜¯ç½‘点å°å—å°åˆ·éƒ½éžå¸¸è½»æ¾ï¼Œå› 为硬度较高的胶辊已接近刮墨刀的刮墨效果。
如果将国产å°åˆ·æœºçš„部分油墨胶辊的硬度由原æ¥çš„35°±3æ高到75°±3,生产效率和å°åˆ·å“è´¨é‡ä¹Ÿä¼šéšç€æ高。
二åå››ã€çº¸ç®±æŸ”版å°åˆ·ä¸åˆ®å¢¨åˆ€å¯¹å°åˆ·å“è´¨é‡å½±å“
刮刀的压力ã€é”‹åˆ©åº¦ã€ä¸Žç‰ˆçš„接触ä½ç½®ç‰éƒ½å¯¹å°åˆ·è´¨é‡æœ‰å½±å“ã€‚æ ¹æ®å®žé™…需è¦ï¼Œåˆç†çš„è°ƒæ•´è¿™äº›å› ç´ ï¼Œèƒ½è§£å†³è®¸å¤šå°åˆ·ä¸çš„问题。
(1)压力
å½±å“åˆ®å¢¨åˆ€åŽ‹åŠ›çš„å› ç´ æ˜¯æ°”ç¼¸åŽ‹åŠ›çš„å¤§å°ã€ç¡¬è½¯åˆ€ç‰‡çš„ä¸åŒã€åˆ®å¢¨åˆ€ä¸Žå°ç‰ˆäº¤å‰çš„角度ç‰ï¼Œæ–œåº¦è¶Šå¤§ï¼ŒåŽ‹åŠ›å°±è¶Šå¤§ã€‚过大的压力会é™ä½Žæ²¹å¢¨çš„转移率,对å°ç‰ˆã€åˆ€ç‰‡çš„磨æŸè¾ƒå¤§;过å°çš„压力容易å‘生è„版或出现刮刀线。
(2)刀的锋利度
刀的锋利度å–决于是å¦æ–°åˆ€ã€ç£¨åˆ€æ—¶çš„刀刃角度ã€æ‰€ç”¨ç ‚纸(油石)çš„åž‹å·ç‰ã€‚刀的适åˆé”‹åˆ©åº¦åº”是既有效地刮干净油墨,åˆä¸äº§ç”Ÿåˆ€ä¸ã€‚过于锋利的刮刀往往容易产生刀ä¸ç—•è¿¹ï¼ŒåŒæ—¶åˆç£¨æŸå°ç‰ˆã€‚
(3)刮墨刀接触å°ç‰ˆçš„è·ç¦»
刮刀接触å°ç‰ˆè·ç¦»çš„å‡å°‘有利于æ高油墨转移率,但åˆå®¹æ˜“产生è„版;å之å¯ä»¥æœ‰æ•ˆåœ°è§£å†³è„版,并é¿å…一些细å°çš„线痕,但会é™ä½Žæ²¹å¢¨è½¬ç§»çŽ‡ã€‚
(4)刀的平整度
刀的平整与翘曲主è¦å–决于安装的方法,当然也有å¯èƒ½ä¸Žåˆ€æž¶æ§½ä¸æˆ–刀片ã€è¡¬ç‰‡ä¸Šç²˜æœ‰å¼‚物有关。
刀的平整度较差时,会使å°åˆ·é¢è¾¹ç¼˜å‡ºçŽ°ä¸€äº›æ°´ç 状的å°ç—•ï¼Œæˆ–者ä¸æ—¶åœ°å‡ºçŽ°ä¸€äº›é—´æ–的线痕。有人认为油墨粗糙ã€æ²¹å¢¨æµåŠ¨æ€§ä¸å¥½æ‰ä¼šäº§ç”Ÿä¸Šè¿°çŽ°è±¡ï¼Œå…¶å®žï¼Œåˆ€ä¸å¹³æ•´ä¹Ÿä¼šå‘生这ç§çŽ°çŠ¶ã€‚
(5)ã€åˆ®å¢¨åˆ€çš„移动
刮墨刀左å³ç§»åŠ¨å¯¹å‡å°‘刮刀线,æ高刮刀利用率,å‡å°‘对版的磨æŸæœ‰ç€é‡è¦çš„作用。如果刮墨刀移动ä¸æ£å¸¸ï¼Œåº”想办法进行改进。
å°åˆ·ä¸å‡ºçŽ°çº¿ç—•æ—¶ï¼Œä¸€æ˜¯é€ æˆç‰ˆä¼¤ï¼ŒäºŒæ˜¯åˆ®åˆ€ä¸é”‹åˆ©ã€‚但是,å¦å¤–æœ‰ä¸€ä¸ªåŽŸå› å°±æ˜¯æœ‰å¼‚ç‰©ç²˜åœ¨åˆ€åˆƒèƒŒåŽã€‚解决的方法是å‰åŽä¸Šä¸‹ç§»åŠ¨åˆ®å¢¨åˆ€ï¼Œä»¥ä¾¿ç”©æŽ‰ç²˜ç€ç‰©ï¼Œå¦‚æžœæ— æ³•ç”©æŽ‰çš„è¯ï¼Œå°±åªèƒ½åœæœºæ“¦åˆ®å¢¨åˆ€äº†ã€‚
还有一个难题是与刮刀有关,并且ä¸å°‘人误解为是油墨所致的。这是指有时出现ä¸è§„åˆ™çš„å‡ åæ¡é•¿çŸä¸ä¸€çš„线痕,看上去就åƒæ˜¯æ²¹å¢¨å †æˆçš„ä¸€æ ·ï¼Œå®ƒä¸åŒäºŽåˆ®åˆ€çº¿ï¼Œä¸æ˜¯è¿žç»çš„ï¼Œè€Œæ˜¯æ—¶æœ‰æ—¶æ— ï¼Œè¿™å…¶å®žæ˜¯åˆ®åˆ€çš„åŽ‹åŠ›è¿‡å°æˆ–刮刀ä¸å¤Ÿé”‹åˆ©æ‰€è‡´ã€‚
ä»¥ä¸Šåˆ®åˆ€çš„å‡ ä¸ªæŒ‡æ ‡æ—¢æœ‰åŒºåˆ«åˆæœ‰ç›¸ä¼¼çš„一é¢ï¼Œåœ¨è§£å†³å…·ä½“问题时,å¯ä»¥è¿ç”¨å…¶ä¸ä¸€é¡¹ï¼Œæœ‰æ—¶åˆéœ€ç»¼åˆè¿ç”¨æ‰èƒ½å½»åº•è§£å†³é—®é¢˜ã€‚如,当出现一些间æ–的墨线时,既å¯ä»¥åŠ 大压力解决,也å¯é€šè¿‡ç£¨åˆ€è§£å†³;当出现较严é‡çš„è„ç‰ˆæ—¶ï¼Œå°±éœ€å‡ æ–¹é¢ç»“åˆèµ·æ¥è¿ç”¨äº†;一è¦ä½¿ç”¨é”‹åˆ©çš„刀片,二è¦åŠ 大压力,三è¦å¢žåŠ 刮刀与接触片é¢çš„è·ç¦»ã€‚
当刮刀磨æŸè¾ƒä¸¥é‡ï¼Œç”¨ç ‚纸ã€æ²¹çŸ³éƒ½æ— 法修磨时,å¯ç”¨ä¸“ç”¨ç£¨åˆ€æœºè¿›è¡Œä¿®ç£¨è¿™æ ·å°±å¯é‡å¤ä½¿ç”¨å‡ é,大大地é™ä½Žäº†åˆ®å¢¨åˆ€çš„æˆæœ¬ã€‚
HIFU MACHINE uses HIFGH INTENSITY FOCUSE ULTRASOUND TECHNOLOGY,so hat the skin tissue createS the thermal,and make high-speed friction cells to stimulate collagen.Such heat effect will not hurt the epidermis, because the treatment fast and direct access to the treatment site within 0-0.5 seconds, without touching the surrounding tissueand can be passed directly to the superficial tendon membrane system (SMAS).
THE HIFU MACHINE can be done firm skin while pulling the muscle layer, thin face up to he progressive effect. What is SMAS? Lift operation at present by plastic surgeons do operation layer, the SMAS layer, which is (superficial musculoaponeurotic system, referred to as the fascia (fascia) SMAS) layer on the skin depth is about 4.5mm, subcutaneous fat and muscle.
Guangzhou serika Technology Co., Ltd. , https://www.serikamedical.com